Last month, we released an SDK for the Shopware App Server in JavaScript. Written in pure TypeScript, this SDK is highly portable and can be used across various environments, including Node.js, Deno, Cloudflare Workers, and more. The SDK only uses Web APIs like Web Crypto and Fetch to ensure it can be used in any environment. This blog post will show you how to build a Shopware app using this SDK.
What does the SDK offer?
The SDK offers a wide range of features, including:
Registration Process: Simplifies the app registration process with Shopware.
Request/Response Verification and Signing: Ensures secure communication between your app and Shopware.
Preconfigured API Client: It makes interacting with Shopware's API easy.
Entity Repository: Provides a simple way to interact with Shopware entities.
How to get started?
For this example, we will use Node together with the Hono Web framework, but you can also use Deno or Bun. Hono is a lightweight web framework which also is built on Web Standards and allow you to build a web application for any JavaScript runtime, the perfect match for the Shopware App Server SDK. First, we create a new project and install the SDK, Hono and SQLite storage as storage for the Shopware Registrations:
# Create a new project
npm init -y

# Install the SDK
npm install --save @shopware-ag/app-server-sdk

# Install the storage
npm install --save better-sqlite3

# Install Hono
npm install --save hono @hono/node-server
Next, we create a new file called index.ts and add the following code:
import { serve } from '@hono/node-server';
import { BetterSqlite3Repository } from '@shopware-ag/app-server-sdk/integration/better-sqlite3';
import { configureAppServer } from '@shopware-ag/app-server-sdk/integration/hono';
import { Hono } from 'hono';
import { logger } from 'hono/logger';

const app = new Hono();

app.use(logger());

configureAppServer(
    app,
    {
        appName: 'MyApp',
        appSecret: 'MyApp',
        shopRepository: new BetterSqlite3Repository('shop.db'),
    }
);

serve(app);
This code sets up a new Hono server and configures the Shopware App Server SDK with the app name, app secret, and an SQLite repository for storing shop data.
Finally, we can start the server by running:
node --watch --experimental-strip-types index.ts
(--watch and --experimental-strip-types are new features in Node.js 22. For older versions you can use tsx)
That's it! You now have a Shopware app Server running on your local machine at http://localhost:3000.
Registering your app with Shopware
First, we need to create a new app in Shopware by creating a new folder in custom/apps/<name> and adding a manifest.xml file
<?xml version="1.0" encoding="UTF-8"?>
<manifest xmlns:xsi="http://www.w3.org/2001/XMLSchema-instance" xsi:noNamespaceSchemaLocation="https://raw.githubusercontent.com/shopware/platform/trunk/src/Core/Framework/App/Manifest/Schema/manifest-2.0.xsd">
    <meta>
        <name>MyApp</name>
        <label>MyApp</label>
        <author>Test</author>
        <copyright>Test</copyright>
        <license>MIT</license>
        <version>0.0.1</version>
    </meta>
    <setup>
        <registrationUrl>http://localhost:3000/app/register</registrationUrl>
        <secret>MyApp</secret>
    </setup>
    <webhooks>
        <webhook name="appActivate" url="http://localhost:3000/app/activate" event="app.activated"/>
        <webhook name="appDeactivated" url="http://localhost:3000/app/deactivate" event="app.deactivated"/>
        <webhook name="appDelete" url="http://localhost:3000/app/delete" event="app.deleted"/>
    </webhooks>
</manifest>
This manifest file contains the app name, version, and registration URL. It also includes webhooks for app activation, deactivation, and deletion, so our app server will be notified when these events occur. The configureAppServer function automatically registers all those URLs. For more information about this, look here: Integration Docs.
When you install the App in the Shopware Admin, the registration process will be triggered, and the App will be registered with Shopware. You can see in the console the requests like this:
<-- GET /app/register
--> GET /app/register 200 7ms
<-- POST /app/register/confirm
--> POST /app/register/confirm 204 2ms
<-- POST /app/activate
--> POST /app/activate 204 2ms
Adding a new action button
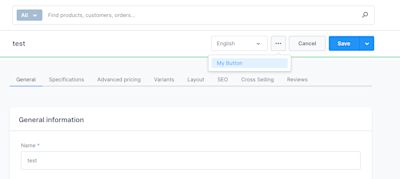
Now that our app is registered, we have added a new button to the administration Product Detail page to trigger functionality in our app server. We can do this by adding a new Route to our Hono app.
import { createNotificationResponse } from '@shopware-ag/app-server-sdk/helper/app-actions';

// ...

app.post('/app/action-button', async (c) => {
    return createNotificationResponse('success', 'Action button clicked!');
});
This code adds a new route to our App that returns a success notification when clicking the action button.
And in the manifest.xml file, we need to add the new route:
<manifest>
<!-- ... -->
<admin>
    <action-button action="trigger" entity="product" view="detail" url="http://localhost:3000/app/action-button">
        <label>My Button</label>
    </action-button>
</admin>
<!-- ... -->
</manifest>
This code adds a new action button to the Product Detail page in the Shopware Admin. When clicking the button, it sends a request to our app server at http://localhost:3000/app/action-button.
So after reinstalling the App or increasing the version number and updating the App, the new button will be visible on the Product Detail page.

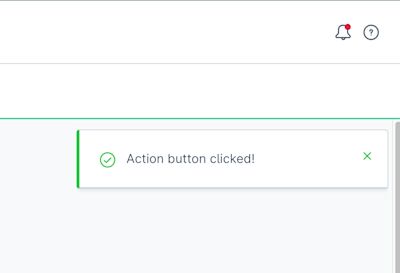
And after clicking the button you will see the notification:

Accessing the Payload
If we know what to get the actual payload (e.g., the product ID), we can access it using the Context. Whenever a request is made to the app server, the Context will be passed to the route handler. The Context contains the payload, the shop that made the request, and an HTTP client.
Here is an example of how to access the payload in the action button route:
import type { Context, ShopInterface } from '@shopware-ag/app-server-sdk';
import type { ActionButtonRequest } from '@shopware-ag/app-server-sdk/types';

app.post('/app/action-button', async (c) => {
    const context = c.get('context') as Context<ShopInterface, ActionButtonRequest>;

    // This is now typed as the ActionButtonRequest given to Context
    console.log(context.payload.data.ids);

    return createNotificationResponse('success', 'Action button clicked');
});
This code accesses the payload data from the context and logs the product IDs to the console.
Requesting the Shopware API
If you want to request the Shopware API, you can use the httpClient class provided by the Context.
app.post('/app/action-button', async (c) => {
    const context = c.get('context') as Context<ShopInterface, ActionButtonRequest>;

    const response = await context.httpClient.get('/_info/version');

    console.log(response.body.version);

    return createNotificationResponse('success', 'Action button clicked');
});
So we see in the console the Shopware version when the button is clicked:
<-- POST /app/action-button
6.6.6.0
--> POST /app/action-button 200 108ms
Note: If you want to read entities from the Shopware API, you will need to first ask for permission inside the manifest.xml file.
Conclusion
In this blog post, we showed a simple example of how to build an app using the Shopware App Server SDK in JavaScript. The SDK offers many more features, such as Entity Repository abstraction, a Sync Service, various Repositories for different databases, and more. If you want to learn more about the SDK, you can check out the official documentation.
If you have any questions or feedback, feel free to contact us on Slack.


