Tips for setup, extensions & more
Since July 1, 2023, Universal Analytics has become history, and the era of Google Analytics 4 (GA4) has begun. For many web analysts and SEOs, this transition poses a significant change and challenge. We will explain the differences between UA and GA4, how to set it up correctly for Shopware 6, and which extensions can assist you in this process!
In this blog post, you'll learn:
How to switch from Universal Analytics to Google Analytics 4
The different tracking options and what GA4 events are
How to set up GA4 for Shopware 6
How to switch from Universal Analytics to Google Analytics 4
There are two ways to switch from Universal Analytics to Google Analytics 4. You can either upgrade an existing Universal Analytics property or start from scratch by creating a new GA4 property if no UA property was previously set up.
To upgrade an existing UA property, go to the Analytics settings in the "Admin" tab. There, you'll find an upgrade button for GA4. Clicking this button will take you to a settings page where you can start the upgrade.
Important: The existing Universal Analytics property, including all data views, remains unchanged. So, you don't have to worry about breaking or losing anything. However, data from the existing UA property will not be imported into GA4, meaning your data collection will start from scratch. The upgrade sets up a new GA4 property based on the setup of the existing UA property. If you're using gtag, Google Analytics will do this automatically for you. If you're using analytics.js, you'll need to make minimal adjustments to the tracking.
If no Universal Analytics property existed before, or if you prefer to set it up entirely from scratch, you can also create a new GA4 property. To do this, click on the "Create Property" button in the "Admin" tab. Since October 2020, a GA4 property is created by default. Once you fill in the requested information, your GA4 property will be created. To start receiving data, you just need to implement the gtag on your website.
Standard tracking, custom tracking & ecommerce tracking – the world of events & numbers
Switching from Universal Analytics to Google Analytics 4 is one of the most radical changes in the history of Analytics. It's not just the user interface that has changed – GA4 is based on a completely different technology. You therefore need to plan your entire integration from scratch.
The main difference lies in how data is collected. GA4 focuses on users rather than sessions. With Universal Analytics, you received data based on "Acquisition," "Behavior," and "Conversions," which were based on page views, events, or sessions. In GA4, data collection primarily revolves around user engagement and event tracking. Every interaction is treated as an event.
Google Analytics 4 distinguishes between four types of events: automatically collected events, enhanced measurement events, recommended events, and custom events. Once you integrate the GA4 tracking code on your website, some events are automatically captured, such as page views (page_view), session starts (session_start), user engagement (user_engagement), and first visits (first_visit). These events cannot be disabled.
Enhanced measurement events can be enabled during the setup of the data stream. They provide deeper insights into user behavior and include events like scrolls (scroll), clicks on outbound links (click), site search (view_search_results), video engagement (video_start, video_progress, video_complete), and file downloads (file_download).
Google also recommends enabling the following events:
Event | Trigger |
ad_impression | A user sees an ad (app only). |
earn_virtual_currency | A user earns virtual currency (e.g., coins, gems, tokens). |
join_group | A user joins a group. |
login | A user logs in. |
purchase | A user completes a purchase. |
refund | A user receives a refund. |
search | A user searches your content. |
select_content | A user selects content. |
share | A user shares content. |
sign_up | A user signs up. |
spend_virtual_currency | A user spends virtual currency (e.g., coins, gems, tokens). |
tutorial_begin | A user starts a tutorial. |
tutorial_complete | A user completes a tutorial. |
add_payment_info | A user submits payment information. |
add_shipping_info | A user submits shipping information. |
add_to_cart | A user adds items to the cart. |
add_to_wishlist | A user adds items to the wishlist. |
begin_checkout | A user starts the checkout process. |
generate_lead | A user submits a form or requests information. |
purchase | A user completes a purchase. |
refund | A user receives a refund. |
remove_from_cart | A user removes items from the cart. |
select_item | A user selects an item from a list. |
select_promotion | A user selects a promotion. |
view_cart | A user views his/her cart. |
view_item | A user views an item. |
view_item_list | A user views a list of items or offers. |
view_promotion | A user views a promotion. |
Google Analytics 4 also allows you to set up custom events tailored to your specific needs. You can either define these custom events directly in GA4 — a quick and easy setup option that doesn't allow for complex filters or advanced triggers — or use Google Tag Manager to create event triggers for more complex tracking requirements.
How to: Set up GA4 for Shopware 6
You've set up a Google Analytics 4 property and created events, but now the question is how to implement your GA4 property on your website.
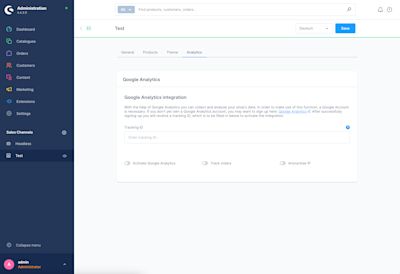
If you're only using the standard events with Google Analytics 4, you can integrate GA4 into Shopware 6 administration without needing an extension. To do this, select your desired sales channel in the admin, then click on the "Analytics" tab. Here, you can enter the tracking ID from your Google Analytics account to activate the integration. You can find the tracking ID in your account under:
Admin > Property > Tracking Info > Tracking Code

For most web analysts and SEOs, the standard events of GA4 are not sufficient. For custom events and advanced tracking, GA4 needs to be set up with the help of Google Tag Manager and implemented in Shopware 6. The Tag Manager must then be integrated into SW6 via an extension.
GA4 setup for Shopware 6 – which extensions?
We have tested various extensions and here is a brief overview of our selection:
Google Analytics 4 – GA4 for Shopware 6 by D-I-S commerce engineering
This extension allows for easy integration of Google Analytics 4 with Shopware 6 via Tag Manager and offers an enhanced ecommerce GA4 data layer with improved data quality. The extension supports data privacy implementation in the standard Shopware privacy extension or other consent managers like Cookiebot and Usercentrics. UserID tracking and Google Ads tracking are optional features.
➡️ Link to extension: Google Analytics 4 - GA4 for Shopware 6
Google Tag Manager & Google Analytics (GA4 ready) for Shopware 6 by Webmatch GmbH
Webmatch's extension enables seamless integration of Google Tag Manager and Google Analytics into Shopware 6. It gives you full control over the data layer for improved performance and analysis of customer behavior. This can be implemented in a GDPR-compliant manner.
➡️ Link to extension: Google Tag Manager & Google Analytics (GA4 ready) for Shopware 6
Google Tag Manager + Google Analytics 4 + Remarketing (SW6) by codiverse
With this codiverse extension, you can integrate the Tag Manager into Shopware without programming knowledge. The extension also provides enhanced conversions in the checkout.
➡️ Link to extension: Google Tag Manager + Google Analytics 4 + Remarketing (SW6)
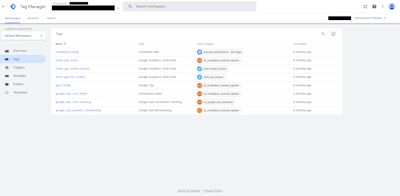
Setting up GA4 in Google Tag Manager
Google Tag Manager is a virtual container that allows additional codes, like web tracking, to be configured and deployed instantly on the website. This has several advantages, such as:
No developer is needed once the Tag Manager is integrated. For example, marketing can independently integrate tracking without needing development.
Google Analytics 4 can be expanded with customizations without having to work on the website's source code.
Integrated versioning allows for tracking and undoing changes.
Multi-user capability and permissions management are available. Users can create tags but not publish them, while another user performs the final review and testing before the content is published.
We generally recommend setting up GA4 with the help of Tag Manager as it allows you to track many more and especially personalized events. To send event data from Google Tag Manager to GA4, you need two tags that work together.
Firstly, the Google tag enables the data flow from the website to Google Analytics and other destinations, and GA4 event tags. With a GA4 event tag, you can set up custom events on the website without needing to write code. The data will then be included in GA4 reports.

Setting up GA4 configuration (Google tag)
For the integration of Google Analytics and Google Tag Manager to work, you first need a GA4 configuration tag (Google tag), which you can set up as follows:
Open Google Tag Manager and the respective container.
Open the "Tags" menu and click the "New" button.
Name the Google tag (e.g., GA4 Configuration).
In the "Tag Configuration" field, select the tag type "Google Tag" and enter your Google tag ID (you can find this in Google Ads, Google Analytics, and Google Tag Manager).
Optionally, you can set additional configuration options here.
Create a trigger: Here, you define when the Google tag should be loaded. If the website does not use a consent management platform (CMP), you can use the trigger "Initialization – All Pages". If you use a CMP, you will learn more about it in the next section.
Cookie consent management
Google Analytics 4 is a traffic analysis tool that processes user data. According to the EU GDPR, you are required to obtain explicit consent for the use of any cookies or trackers that process personal data on your website. To be legally compliant, your Google tag should only be triggered when the user has consented to the use of cookies.
The topic of "Consent Management" is extremely important for further analysis of user data. Incorrect tools or settings can significantly impair data quality. We always recommend a thorough review of the current status and making adjustments if necessary.
To set up in Tag Manager, you need a cookie configuration tag and a trigger configuration that you can apply to all your tags:
Cookie tag configuration

Depending on the CMP you use, Google Tag Manager offers various templates for tag configuration. You can find these in the Community Template Gallery. Search for the appropriate template and fill in the fields.
Cookie trigger
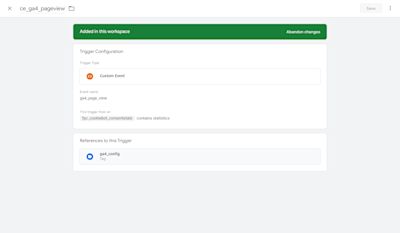
Depending on the CMP you use and how you declare the cookies within it, there are various options for when a tag should be triggered, such as Necessary, Preferences, Statistics, Marketing. These are familiar from the cookie settings that pop up when you first open a website. If the Google tag for GA4 should only be triggered when the user consents to the statistics cookies, this must be specified in the trigger of the Google tag.
For the trigger configuration, select the trigger type "Custom Event". The trigger should only be triggered if the variable (e.g., Cookiebot Consent State) contains "statistics". There are also community templates for the variable in the gallery.
Important: We always recommend consulting with your data protection officer and/or a lawyer regarding cookie consent, as we are not authorized to provide legal advice.

GA4 Event Tags (Google Ads, form downloads, ecommerce events, ...)
Once you've set up a Google tag in Tag Manager and implemented it on your website, Google Analytics will initially only collect standard events. If you want to track specific events, such as Google Ads conversions, contact form submissions, or ecommerce events, you need to create event tags in Tag Manager.
You can also create these in the "Tags" menu by clicking the "New" button. For Google Ads, you will find a template for Google Ads conversion tracking there. For custom events, select the tag type "Google Analytics: GA4 Event," set the appropriate parameters, and configure a suitable trigger.
To check if your GA4 setup for Shopware 6 works via Google Tag Manager, you can use the preview mode in Tag Manager to see if tags are firing and what values are included.
Google Analytics 4 also offers a "Debug View," where you can evaluate if the desired data is being collected. You can find this under Admin > Data Stream > Debug View, and it should be closely monitored, especially when setting up ecommerce tracking.
How we support you in setting up GA4 for Shopware 6
The transition to GA4, the correct setup in Tag Manager, and the implementation of Shopware 6 can be challenging at first. However, without data, you can't move forward, so the transition is urgently necessary. We are happy to support you in setting up GA4 for your shop.
The agency Webneo, with offices in Dresden, Leipzig, and Berlin, offers a comprehensive range of services in digital marketing. With more than ten years of experience as a digital agency, it specializes in B2B solutions. The agency's offerings include design, ecommerce, and marketing.


